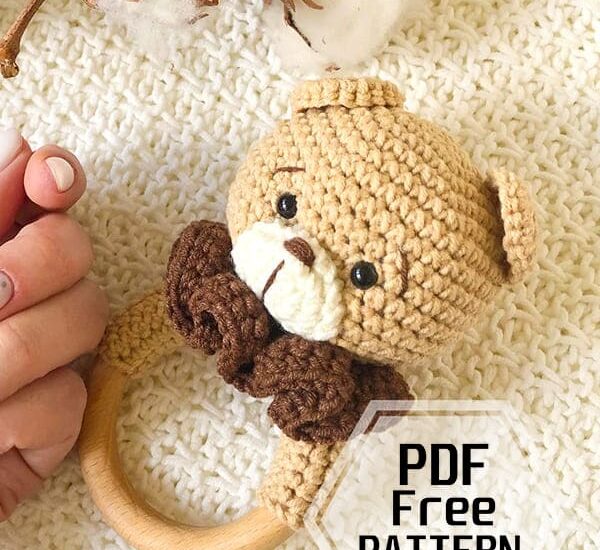
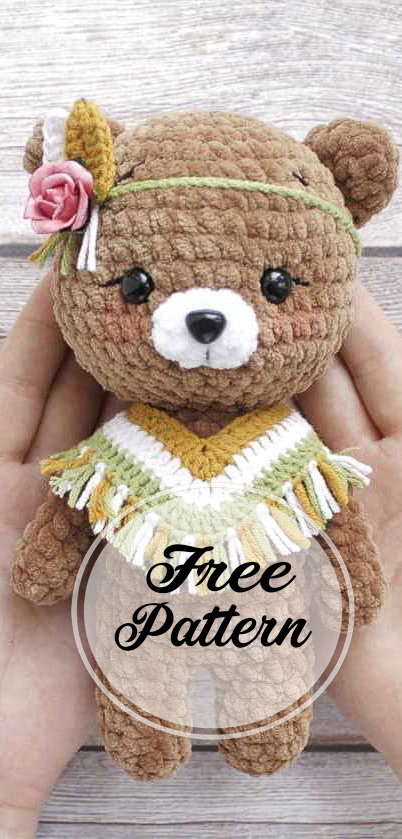
Hello friends, today I am going to share the teddy bear amigurumi pattern. I haven’t shared any teddy bear models for a long time. Today’s motif is the amigurumi teddy bear motif. The amigurumi bear motif is made from velvet rope. However, if you wish, you can use a different thread. However, if you use a different thread, it will be as small as the size of the keychain. I suggest you consider this before doing so. Enjoy the free bear and panda amigurumi pattern! With this pattern you will get a little bear about 11cm (4.3 ″) tall using yarnArt Jeans yarn and 2.0mm hook and a teddy bear about 20cm (7.8 ″) high using YarnArt Dolce yarn and 4.0mm crochet hook.
Materials:
For little bear: YarnArt Jeans yarn, 1.7-2.0 mm crochet hook
For plush bear: YarnArt Dolce yarn, 4.0 mm crochet hook
Safety eyes
Black embroidering floss
Sewing needle
Scissors
Fiberfill
Abbreviations:
R = row
mc = magic circle (magic ring)
ch = chain
sc = single crochet
DC = double crochet
inc = 2 sc in the next stitch
dec = single crochet 2 stitches together
F.o. = fasten off
(12) = number of stitches you should have at the end of the round/row
( )* 6 = repeat whatever is between the brackets the number of times stated
Head
R 1: 6 sc in mc (6)
R 2: (inc)*6 (12)
R 3: (1 sc, inc)*6 (18)
R 4: (2 sc, inc)*6 (24)
R 5: (3 sc, inc)*6 (30)
R 6: (4 sc, inc)*6 (36)
R 7: (8 sc, inc)*4 (40)
R 8-13: 40 sc (6 rows)
Insert safety eyes between R 11 and R 12 at the distance of 4-5 st from each other.
R 14: (8 sc, dec)*4 (36)
R 15: (4 sc, dec)*6 (30)
R 16: (3 sc, dec)*6 (24)
R 17: (2 sc, dec)*6 (18)
R 18: (1 sc, dec)*6 (12)
F.o.
Ears (make 2)
R 1: 6 sc in mc (6)
R 2: (1 sc, inc)*3 (9)
R 3-4: 9 sc (2 rows)
F.o. and leave a long tail for sewing.
Muzzle
With white yarn:
R 1: 6 sc in mc (6)
R 2: 2 sc, inc, 2 sc, inc (8)
F.o. and leave a long tail for sewing.
Embroider nose, sew the muzzle to the head.
Eye spots (make 2)
With black yarn:
R 1: in mc 3 sc, 1 DC, 3 sc
F.o.
Arms (make 2)
R 1: 7 sc in mc (7)
R 2-8: 7 sc (7 rows)
Fold top of arm flat and 3 sc through both sides across.
F.o.
Tail
R 1: 8 sc in mc (8)
R 2-3: 8 sc (2 rows)
F.o. and leave a long tail for sewing.
Legs and bodyAmigurumi bear tutorial
Legs (make 2)
For bear: with brown yarn
For panda: with black yarn
R 1: 6 sc in mc (6)
R 2: (1 sc, inc)*3 (9)
R 3-6: 9 sc (4 rows)
F.o.
Don’t cut the yarn when you will finish the second leg!
From second leg: 2 ch, join with the first leg.
Continue crocheting the body in the round:
R 7: 9 sc on the first leg, 2 sc in 2 ch, 9 sc on the second leg, 2 sc in 2 ch (opposite side) (22)
R 8-9: 22 sc (2 rows)
You can change the yarn to the sweater’s color in the next row:
R 10-16: 22 sc (7 rows)
In the next row we will join arms:
R 17: 5 sc, 3 sc together with sc of the 1st arm, 8 sc, 3 sc together with sc of the 2nd arm, 3 sc (22)
R 18: (2 sc, dec)*5, 2 sc (17)
R 19: (1 sc, dec)*5, 2 sc (12)
F.o.
Scarf (for little bear)
With red yarn:
Make 42 ch.
From the 3rd ch from hook: 40 DC in every st to the end of row.
F.o. and leave a long tail for sewing.
Sew the scart to the body.
Assembly
Insert safety eyes between R 11 and R 12 at the distance of 4-5 st from each other.
Sew the eye spots to the head between R 11 and R 12.
Sew ears to the head in between R 5 and 8.
Embroider eyebrows between R 7 and R 8.
Designed and photos by Anastasiia Traino
Instagram: @barberry_store
Translated by Amigurumiforum.com