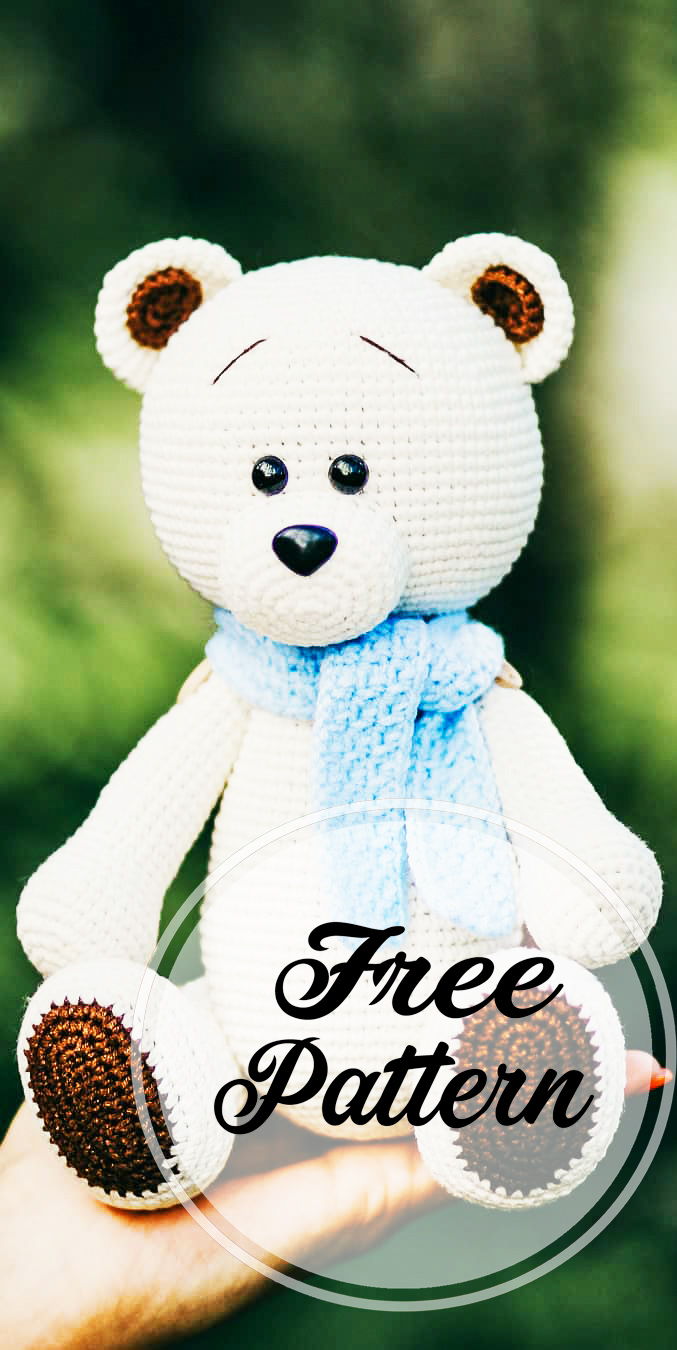
Hello friends. I found a beautiful white bear for you today. I hope you will like it.
Use this free amigurumi bear pattern to crochet your own cute white bear! The legs and arms can move, they are joined to the body with buttons. The height of the finished bear is about 20 cm (7.8″).
Materials:
Yarn: YarnArt Jeans #03 (white) and YarnArt Jeans #40 (brown)
Hook size: 1.75 mm or 2.0 mm
8-10 mm safrty eyes
A plastic nose 15×12 mm
Stitch marker
2 buttons d=15 mm and two buttons d=20 mm
Tapestry needle
Scissors
Fabric glue
Fiberfill
Abbreviations:
R = row
mc = magic circle (magic ring)
ch = chain
sc = single crochet
inc = 2 sc in the next stitch
dec = single crochet 2 stitches together
BLO = back loop only
F.o. = fasten off
(12) = number of stitches you should have at the end of the round/row
( )* 6 = repeat whatever is between the brackets the number of times stated
Head
With white yarn:
R 1: 6 sc in mc (6)
R 2: (inc)*6 (12)
R 3: (1 sc, inc)*6 (18)
R 4: 1 sc, inc, (2 sc, inc)*5, 1 sc (24)
R 5: (3 sc, inc)*6 (30)
R 6: 2 sc, inc, (4 sc, inc)*5, 2 sc (36)
R 7: (5 sc, inc)*6 (42)
R 8: 3 sc, inc, (6 sc, inc)*5, 3 sc (48)
R 9: (7 sc, inc)*6 (54)
R 10: 4 sc, inc, (8 sc, inc)*5, 4 sc (60)
R 11: (9 sc, inc)*6 (66)
R 12: 5 sc, inc, (10 sc, inc)*5, 5 sc (72)
R 13: (11 sc, inc)*6 (78)
R 14-26: 78 sc (13 rows)
R 27: (11 sc, dec)*6 (72)
R 28: 5 sc, dec, (10 sc, dec)*5, 5 sc (66)
R 29: (9 sc, dec)*6 (60)
R 30: 4 sc, dec, (8 sc, dec)*5, 4 sc (54)
R 31: (7 sc, dec)*6 (48)
R 32: 3 sc, dec, (6 sc, dec)*5, 3 sc (42)
R 33: (5 sc, dec)*6 (36)
R 34: 2 sc, dec, (4 sc, dec)*5, 2 sc (30)
Stuff with fiberfill.
F.o.
Muzzle
With white yarn:
R 1: 6 sc in mc (6)
R 2: (4 sc in one st, 2 sc)*2 (12)
R 3: 1 sc, 3 inc, 3 sc, 3 inc, 2 sc (18)
R 4: 2 sc, 3 inc, 6 sc, 3 inc, 4 sc (24)
R 5: 3 sc, (inc, 1 sc)*3, 6 sc, (inc, 1 sc)*3, 3 sc (30)
R 6-9: 30 sc (4 rows)
F.o. and leave a long tail for sewing.
Sew muzzle to the head between R 21 and R 31, put some fiberfill inside before you finish.
Insert safety eyes above the muzzle at theat the distance of 4 st from each other.
Glue the nose to the muzzle.
Ears
Inner part (make 2)
With brown yarn:
R 1: 6 sc in mc (6)
R 2: (4 sc in one st, 2 sc)*2 (12)
R 3: (1 sc, inc)*2, 2 sc, (1 sc, inc)*2, 2 sc (16)
F.o. and leave a long tail for sewing.
Crochet bear tutorialOuter part (make 2)
With white yarn:
R 1: 6 sc in mc (6)
R 2: (inc)*6 (12)
R 3: (1 sc, inc)*6 (18)
R 4: (2 sc, inc)*6 (24)
R 5: (3 sc, inc)*6 (30)
R 6-7: 30 sc (2 rows)
R 8: (3 sc, dec)*6 (24)
F.o. and leave a long tail for sewing.
Fold top of ear flat and 12 sc through both sides across.
Sew the inner parts of the ears on the outer ones.
Sew the ears to the head between R 6 and R 15.
Body
With white yarn:
R 1: 6 sc in mc (6)
R 2: (inc)*6 (12)
R 3: (1 sc, inc)*6 (18)
R 4: 1 sc, inc, (2 sc, inc)*5, 1 sc (24)
R 5: (3 sc, inc)*6 (30)
R 6: 2 sc, inc, (4 sc, inc)*5, 2 sc (36)
R 7: (5 sc, inc)*6 (42)
R 8: 3 sc, inc, (6 sc, inc)*5, 3 sc (48)
R 9: (7 sc, inc)*6 (54)
R 10: 4 sc, inc, (8 sc, inc)*5, 4 sc (60)
R 11: (9 sc, inc)*6 (66)
R 12-21: 66 sc (10 rows)
R 22: (9 sc, dec)*6 (60)
R 23-24: 60 sc (2 rows)
R 25: 4 sc, dec, (8 sc, dec)*5, 4 sc (54)
R 26-27: 54 sc (2 rows)
R 28: (7 sc, dec)*6 (48)
R 29-31: 48 sc (3 rows)
R 32: 3 sc, dec, (6 sc, dec)*5, 3 sc (42)
R 33-35: 42 sc (3 rows)
R 36: (5 sc, dec)*6 (36)
R 37: 36 sc
R 38: 2 sc, dec, (4 sc, dec)*5, 2 sc (30)
R 39: 30 sc
Stuff with fiberfill.
F.o. and leave a long tail for sewing.
Sew head to the body.
Legs (make 2)
With brown yarn:
Make 9 ch.
R 1: From the 2nd ch from hook: 7 sc, 3 sc in one st, 6 sc, inc (18)
R 2: inc, 6 sc, 3 inc, 6 sc, 2 inc (24)
R 3: 1 sc, inc, 6 sc, (1 sc, inc)*3, 6 sc, (1 sc, inc)*2 (30)
R 4: 2 sc, inc, 6 sc, (2 sc, inc)*3, 6 sc, (2 sc, inc)*2 (36)
Change to white yarn:
R 5: 3 sc, inc, 6 sc, (3 sc, inc)*3, 6 sc, (3 sc, inc)*2 (42)
R 6: 4 sc, inc, 6 sc, (4 sc, inc)*3, 6 sc, (4 sc, inc)*2 (48)
Place the yarn marker in the middle!
R 7: BLO 48 sc
R 8-10: 48 sc (3 rows)
R 11: 18 sc, 6 dec, 18 sc (42)
R 12: 42 sc
R 13: 15 sc, 6 dec, 15 sc (36)
R 14: 12 sc, 6 dec, 12 sc (30)
R 15: 9 sc, 6 dec, 9 sc (24)
Stuff with fiberfill.
R 16: (4 sc, dec)*4 (20)
R 17-26: 20 sc (10 rows)
R 27: (2 sc, dec)*5 (15)
R 28: (1 sc, dec) *5 (10)
Finish stuffing.
R 29: (dec)*5 (5)
F.o.
Attach legs to the body between R 12 and R 13 using buttons. View video tutorial here >>> How to attach jointed arms and legs using buttons.
Arms (make 2)
With white yarn:
R 1: 6 sc in mc (6)
R 2: (inc)*6 (12)
R 3: (1 sc, inc)*6 (18)
R 4: (2 sc, inc)*6 (24)
R 5: (7 sc, inc)*3 (27)
R 6-8: 27 sc (3 rows)
R 9: (7 sc, dec)*3 (24)
R 10: (6 sc, dec)*3 (21)
R 11: (5 sc, dec)*3 (18)
R 12-27: 18 sc (16 rows)
R 28: (1 sc, dec)*6 (12)
Stuff with fiberfill.
R 29: (dec)*6 (6)
F.o.
Attach arms to the body between R 34 or R 35 using buttons.
Tail
With white yarn:
R 1: 6 sc in mc (6)
R 2: (inc)*6 (12)
R 3: (1 sc, inc)*6 (18)
R 4: (2 sc, inc)*6 (24)
R 5-7: 24 sc (3 rows)
R 8: (1 sc, dec)*8 (16)
F.o. and leave a long tail for sewing.
Sew tail to the body.
Designed and photos by Natalia Androsova
Instagram: @androsova_toys
Translated by Amigurumiforum.com